The Flavour Book: Make Awesome Web Apps in Java
Table of Contents
- 1. Introduction
- 2. Architecture
- 3. Getting Started
- 4. Templates
- 5. Standard Components
- 6. Expressions
- 7. Handling Input
- 8. Events
- 9. Routing
- 10. Background Activity
- 11. Modal Dialogs
- 12. Service Calls
- 13. Custom Components
- 14. SVG
- 15. State
- 16. Data Resources
- 17. Styling
- 18. Error Messages
- 19. Appendix A: Additional Resources
- 20. Appendix B: Installing Prerequisites
- 21. Appendix C: Full-Stack Java
- 22. Copyright
1 Introduction
Flavour is a batteries-included framework for making single-page web apps in Java.
🔊 Audio: Flavourcast S01 E01 Introduction
There are lots of SPA frameworks out there. Why pick Flavour?
- One language for your whole app
- Batteries-included tooling
- Type-safe
- Fully commercial-friendly open source
1.1 One language for your whole app
Development is difficult enough without having to switch back and forth between two or more languages. Can you imagine any other industry where the majority of the practitioners were expected to regularly conduct business on the same project using two completely different and incompatible languages? It is absurd, yet that's how much of the industry operates.
With Flavour, your front-end and back end are in the same language. Master its syntax and IDEs, and put your wizardry to work for all your code. Want to change a method name that's used in both the front-end and the back-end? Use your IDE's refactoring tool and the change is applied everywhere at the same time. Even better, Flavour handles the communication boundary with ease, handling data conversions back and forth so you stay at your desired level of abstraction: classes and methods.
1.2 Get full tooling without any configuration
After creating your project using the maven archetype using a one-line command (albeit a long one-line command), you get a full set of modern build tooling automatically. No need to assemble tools, hand-build a config file, or spend hours setting up a project. Everything you need is there instantly:
- Transpiler: Converts Java bytecode to JavaScript
- Minifier: Compresses code by shortening method, class, and field names
- Obfuscator: Replaces identifiers with shortened, encoded versions
- Packager: Combines all code and resources into a single WAR
- Tree-shaker: Removes unreachable classes and methods
1.3 Type-safe
Fed up with front-end tools that don't have strong types, or bolt it on like an afterthought with escape hatches waiting to be abused? No more. Flavour is fully type-safe. Your code is implemented in Java (or other JVM language of your choosing). The Flavour framework is type-safe too, so features like routing have clearly-defined parameters and endpoints, described in code, with IDE support for easy discovery and safe usage.
1.4 Fully commercial-friendly open source
Flavour is licensed under an Apache license, one of the most commercial-friendly licenses around. Make your corporate lawyers happy and skip the licenses with murky entanglements and obligations.
2 Architecture
🔊 Audio: Flavourcast S01 E02: Architecture
Flavour lets you create a single-page app from Java class files. In some ways this is like Java applets, since your Java code can run in the browser. However, unlike applets, Flavour apps appear to the browser as JavaScript and can do anything JS can do, including accessing browser APIs and interacting with HTML and CSS. They can never be obsoleted or blocked as long as JavaScript itself remains supported in browsers. Furthermore, as browsers improve and their JavaScript engines get faster, your app gets faster without any work from you! All told, these facts make Flavour a solid, safe, long-term foundation for your next project.
A Flavour app has an index.html main page which loads the application. By default this page is empty. It simply invokes a JavaScript function called 'main'. This is the transpiled code from your Java main() method. Yes, just like any Java app, the first method invoked is main(). The main method in the Flavour archetype binds the first template to a div in the index.html. The template defines the page contents and allows for dynamic behavior using components and an expression language.
2.1 Routing Architecture
In the majority of applications, it is useful to divide the interface into different pages for different actions or activities. In a Flavour app, you'll create a separate template for each page. The routing feature lets you switch between entire pages. You'll declare an interface for the different pages and their parameters. You'll be able to switch pages in a type-safe way. You can declare the URLs for each page and their parameters. More details coming in the Routing chapter.
2.2 Threading Architecture
Flavour allows you to create threads like you would in any Java
application. You can create a Thread object and start it with
run(). Even when transpiled to JavaScript, the Java behavior
remains, and the thread will execute in the background.
Threads are important for making service calls. Service calls can be
long-running and block the UI, so they must be run on background
threads instead. However, when a service call completes,
and you have updated the data in your application, you'll need to
manually notify Flavour that it is time for an update via
Templates.update(). Another option is to use BackgroundWorker,
which automatically triggers an update when a background task is
complete. More on this in the Background
Activity Chapter
2.3 Object Lifecycles and Garbage Collection
Object lifecycles and garbage collection are also in line with
standard Java behavior. The main class is created at startup, its
main() method invoked, and other objects are instantiated as needed
and then garbage collected when all references to them go out of scope
or are nulled out.
As long as the user stays on the same browser page, the main() method keeps
running and any instantiated objects remain in existence. This is
true even if the user uses Routing to navigate between "pages" in your
app. So if you create a service object in your main method and pass
it to each template, they can all share that service without it having
to be re-instantiated each time. Likewise, if you create a cache of
data retrieved from a server, you can pass that cache to each page.
The data will remain available without refetching from the server as
the user navigates around your app.
However, when the user hits the reload button in the browser, then the browser starts over, reloading the HTML, JavaScript, and calling main() again. All cached state is lost, so any initialization of services and state caching will have to be done again. If you are using routing, then any route should be capable of reinitializng state if visited directly, don't assume that another page will initialize state when it is visited first.
3 Getting Started
To try out Flavour or for starting a new project, the easiest way to get started is to use the maven archetype. With Maven installed, just run this command:
mvn archetype:generate \
  -DgroupId=com.example \
  -DartifactId=flavour \
  -DinteractiveMode=false \
  -DarchetypeGroupId=com.frequal.flavour \
  -DarchetypeArtifactId=teavm-flavour-application \
  -DarchetypeVersion=0.3.0
cd flavour && mvn clean install && firefox target/flavour-1.0-SNAPSHOT/index.html
If you need help installing Maven or Java, see Installing Prerequisites
3.1 Your First Flavour App
With that command, you've already built your first single-page app with Flavour! In the browser you can enter your name, and when you tab out of the field, the message instantly changes to "Hello, name". No server round-trip, no plugin, just Java code transpiled to JavaScript running in the browser, reacting instantly to user input. Hopefully at this point you're starting to think of all of the neat things you could do with this. But first, let's see how this example is wired up.
Like any web application, it is launched from an HTML page, in this
case index.html in the src/main/webapp/ folder. However, like with
most Flavour apps, index.html is very minimalist, a launching point
for the rest of the application. It launches the main() method,
provides a div to hold the application, and is a place to specify the
CSS files used in the app. That's about it.
3.2 Main Client Class Declaration
The interesting part begins in src/main/java/com/example/Client.java.
@BindTemplate("templates/client.html")
public class Client extends ApplicationTemplate {
Your main class must extend ApplicationTemplate. It must also be
bound to a Flavour template from the src/man/resources/templates/
folder, like client.html here. Where this class gets injected into a
page, the HTML from client.html will be inserted.
public static void main(String[] args) {
    Client client = new Client();
    client.bind("application-content");
}
This is the main() method invoked when the page is loaded. It creates
an instance of this class, then binds it to an element on the page.
index.html has a div with id 'application-content'. That div is
initially empty, but client.bind() causes the template (client.html from
earlier) to be injected into the div. Standard HTML content is copied
verbatim, so this message
<label>Please, enter your name</label>
appears directly on the page.
3.3 Interacting with Java
Static HTML by itself isn't very exciting. Where Flavour gets interesting is in the components and expression language. Both are used in the next line, the name input control:
<input type="text" html:value="userName" html:change="userName"/>
html:value is a Flavour attribute component that gets a value from Java code and
places it in the input component. Flavour understands JavaBean
conventions, so it automatically calls getUserName() on the bound
object to get the string to show. In the other direction, html:change
is a Flavour attribute that sets the value entered by the user into a
Java property, in this case by calling setUserName(). When the user
types in a name and tabs out, Flavour calls setUserName() and passes
in the string the user entered. These simple methods are declared in
Client.java:
private String userName = "";

public String getUserName() {
    return userName;
}

public void setUserName(String userName) {
    this.userName = userName;
}
If you've tried the app, you've noticed that after you enter a name and tab or click out of the field, the text below automatically updates to say, "Hello, name". This comes from the following HTML:
Hello, <i><html:text value="userName"/></i>
This is the first use of the html:text component. This Flavour
component is replaced at runtime with the value expression. In this
case, the expression userName is recognized as a JavaBean property
and getUserName() is called, so the user name that was saved earlier using
setUserName() from the input component is fetched here and shown after
'Hello'.
3.4 The Joy of Declarative UIs
At this point you may be wondering, "How do I tell Flavour to render
the html:text component after the user name changes?" Well I have
some great news for you: you don't! Flavour automatically updates the
page after html:change and other change events. As long as you have
declared that an expression depends on a certain field, changes to
that field will cause page updates. This is known as a declarative
model, you declare the source of the information for your page, and
Flavour handles rendering it as the data change. Once you are used to
it, this is a much easier model for UI development, since you don't
have to worry about tightly-coupled update logic deciding which parts
of the UI to update.
3.5 Main Class
The main() method must be declared in the POM file so Flavour knows
to make it the main() function invoked from index.html. In the
autogenerated pom.xml you'll see this line:
<mainClass>com.example.Client</mainClass>
3.6 Folders
The archetype follows the Flavour standard folder layout. Some key files and folders:
- pom.xml: The maven POM file with Flavour included
- src/main/resources/templates/: The folder where HTML templates are stored
- src/main/webapp/: The folder where the main page (index.html) and CSS files (in the css/ folder) are stored
- src/main/java/: The folder where your View classes and other Java code goes
4 Templates
Templates are the primary building blocks of a Flavour UI. Templates are HTML fragments, containing only content you would find inside a body element. Templates are used to define the pages of your application, stored in the resources/templates folder. Reusable portions of template code can be used to create smaller templates for components, stored in the resources/components folder.
Templates are page fragments, so they do not include <html>,
<head>, or <body> tags. Aside from any import statements, they
should contain only one root element, typically a <div>, with everything
else contained inside that root.
Templates are paired with View classes. When a template is
added to a page, an instance of the bound View class is created too.
A View class needs only use the @BindTemplate annotation to bind
itself to a template. From then on, expressions in the template can
reference properties and methods in the View class.
5 Standard Components
Flavour templates can use components to reuse content or behavior. Flavour components can be elements or attributes. If you were showing a listing of books, you could create a custom BookComponent with a Java view class and a template. Then everywhere you wanted to place a book listing on the page, you could reuse the component. Since components can accept parameters, different books could be shown, but each would share the same consistent layout and styling. Custom components will be covered in more detail in a later section.
This section is about standard components, those which ship with the Flavour framework. They provide many core features you will need, from injecting content, to loops, to conditionals. They are automatically available to all templates, there is no need to explicitly import them. Usefully, the standard components are implemented using the same APIs as custom components, so if you want to understand how they work the source code is available.
The rest of this chapter will cover the standard components. They will be covered in popularity order, with the most frequently-used components covered first.
5.1 html:text
🔊 Audio: Flavourcast S01 E04 html:text
Flavour templates are HTML files with special tags to control page
contents and interactions. html:text is one of the most fundamental of these tags.
It allows you to insert a string from Java code into the page. For
example, in the view class for the template you can make a
getUsername() method. Flavour knows about JavaBeans conventions, so
you just have to say 'username'. Specifically, the tag would be:
<html:text value="username" />
When you are planning your page, any place you need a string that is
dynamic, you can use html:text. Usernames, product descriptions, or
numbers, all can be inserted into a page using this tag.
Once you are generating text in Java and adding it to your pages, you might think about returning markup from the Java code too. Avoid this temptation. First off, it won't do what you want. For security reasons, HTML tags in strings returned from Java code are rendered literally on-screen, not as HTML tags. So your nice markup will be shown to the user the way it looks in an editor, not the way a browser would render it. This prevents XSS attacks since even if you show a string entered by a user, attackers can't cause the browser to execute it.
Secondly, if you have markup you should keep that in the HTML file.
So if you want to show the username as a level 1 heading, put the h1
tag in the template, and the html:text tag inside the h1 tag. This
enforces a good separation of concerns between presentation (the HTML
file) and content (the string returned from Java).
So far I've talked just about using a getter to return a string from
the Java code. However, the expression inside the html:text value
attribute can be any Flavour expression that returns a string. A
method that returns a string works, so if you have a method
formatDate() that returns a string, you can place that method
invocation in the value attribute, value="formatDate()". Flavour
expressions also include support for most Java syntax, so you can do
arithmetic or string manipulation directly inside the value attribute.
However, it is a best practice to keep that logic on the Java side and
invoke the method. Logic in the Java method is easier to unit test
and debug. And as mentioned earlier, a good separation of concerns
leaves logic in the Java class, and presentation in the HTML template.
With that, you've learned the key features of the humble html:text
tag. It is a simple but essential part of most Flavour applications.
5.2 html:bidir-value
🔊 Audio: Flavourcast S1 E5 html:bidir-value
When you need input from a user, you can use the HTML input element. It has many types, from text, to dates, to checkboxes, to ranges. The browser keeps a value for the input, but to use the value in code you need it to be set into a Java variable. And vice versa, when you have a value you want shown in an edit component, you'll want to update the input value to match what's in the variable.
This need to keep an input element and a variable in sync is so common
that Flavour has a special tag for that purpose. html:bidir-value is
an attribute placed in an input tag. The value of the tag is the name
of an attribute to keep synced with this input. Flavour handles
calling the getter for that attribute to set up the input value for
the first time, and also calls the setter every time the user changes
the value on the page.
For example, if you were making a basic user settings page, you could have a text input for e-mail address. The tag could be:
<input type="text" html:bidir-value="email"/>
This would tell Flavour to initialize the e-mail field by calling the
getEmail() method on the view class bound to the template. After
the user edits the address, Flavour calls setEmail() passing the new
value into the setter. You don't need to add event listeners or find
DOM elements, it's fully automatic just by using this one attribute.
Reading strings from input fields is common, so that example will get you a long way. How about a field that is more than just a string?
Take, for example, a date. You'll almost always want to operate on a date as a date type, not as a string. But the DOM (and Flavour) insist on passing and retrieving Strings. Fortunately, since Flavour invokes getter and setter methods, you can transform the string to an appropriate type in your Java code. Using a class like DateFormat, your getter can format dates into a string, and your setter can parse dates from the string provided from the user. In this way you get the bidirectional binding, and your code stays clean and strongly typed.
You can also bind a numeric value to an input, like a range input (often displayed as a slider). In the getter, use toString to convert an integer to a string. And in the setter, use parseInt to convert the string from the browser into an integer.
Hopefully this gives you a taste of how html:bidir-value can simplify
user input.
5.3 std:if
🔊 Audio: Flavourcast S1 E6 std:if
Often you'll want to have a portion of your application be hidden or shown based on user interaction or an external event. For example, if the user checks the check box "add me to your mailing list", you could then have the "e-mail address" section displayed.
std:if has a single attribute, called condition. The expression must return a boolean value. If the expression evaluates to true, the HTML inside the std:if start and end tags is shown. Otherwise, the contents are not shown on the page. Note that when the condition is false, the elements are removed from the page completely, not simply hidden using styles.
Take the e-mail address section example above. Say you have a property in your view class called addMe. You have a getter for this primitive boolean attribute with the method name isAddMe, following JavaBeans conventions. You can then use the addMe property as the condition value. Specifically, you would have the start tag, the e-mail address section, and the end tag, as follows:
<std:if value="addMe">
  <!-- e-mail address section here -->
</std:if>
Now the e-mail section will be added to the screen when the addMe property is true, and removed from the screen when addMe is false.
The value expression can be the name of a JavaBeans property (like addMe in our example), or it can be any expression that returns a boolean value. You could create a method in your view class that computes a boolean value on the fly. And since Flavour expressions implement most Java syntax, you can even build a complex boolean expression right in your template. As with other tags, however, I recommend keeping any complex logic in your Java code, keeping the value expression in the template short, just a property name or a method invocation. This keeps a clean separation between presentation (in the template) and logic (in the Java class).
Once you start using std:if in a larger application, you may be tempted to make different pages in one template, with a std:if to control which page is shown based on a page enum. While you could make this work, you'll end up with one big template with all of your application in it (and one big view class too). For entire page switches, you'll want to use Flavour's routing capability, which lets you switch between pages and update the browser URL as well, ensuring bookmarks and the back button work seamlessly. Stick to using std:if for smaller changes to a page, ones where the user wouldn't consider it a page switch or needing a separate bookmark.
5.4 std:foreach
🔊 Audio: Flavourcast S1 E7 std:foreach
std:foreach is a Flavour tag to repeat a portion of a template once for each item in a collection. The repeating portion can use the current item in Flavour expressions. For example, if you are making a book tracking app, you could use std:foreach to show the title and author for each book. Or for a recipe site, you could show the name and picture of each recipe.
std:foreach has an opening and a closing tag. The HTML between those tags is repeated. In the std:foreach opening tag, there are two required attributes: 'var' and 'in'. Similar to a Java foreach expression, 'in' is a List, Set, or other Iterable type. 'var' is the name of the variable used for each item from the collection. So for our book listing example, if the list of books is returned from a method getBooks(), then the opening tag would be
<std:foreach var="book" in="books">
The HTML between this opening tag and the closing tag is repeated once
for each item in the provided collection, in our case, the list from
getBooks(). Let's say you want to print the title and author of each
book in a 2nd-level heading. Start with the <h2>
open tag. Next, to inject the title, use html:text, which is covered
in another episode. <html:text value="book.title"/>. Since
book is the name given to each item from the books list, and Flavour
expressions can use dot notation to access JavaBeans properties, you
can easily call getTitle() by just saying book.title.
So far this example shows just the title in the h2 tag. To finish,
add 'by', then a second html:text with value="book.author". Make
sure to close the h2 tag and the std:foreach tag. All together it
looks like this:
<std:foreach var="book" in="books">
  <h2><html:text value="book.title"/> by <html:text value="book.author"/></h2>
</std:foreach>
To test this out, you can make a hardcoded list of books in your test application, and return it from getBooks(). When you open the page in a browser, you'll see a list of headings with the title and author for each book. Later you can fetch the book list from local storage or the server.
In this first example, I've described how you can use std:foreach to repeat h2 tags for different books. Since std:foreach will repeat any HTML, there are lots of other ways to use it. You can repeat list items using the 'li' tag. You can repeat table rows using 'tr' tags, possibly with different 'td' cells containing different fields. You can repeat whole sections of the page using 'div' tags. And you can even use a Flavour component inside a foreach tag. Custom Components will be covered in a later chapter.
You now know how to make repeating elements in a Flavour page using std:foreach.
5.5 event:click
🔊 Audio: Flavourcast S1 E8 event:click
event:click is the first Flavour event type we'll cover. This attribute is added to an element that you want to react to clicks. It can be used for buttons, text, divs, or the entire body. The value of the attribute is an expression that gets invoked, often a method from the View class.
Say you want to increment a variable in response to a button click. You can implement a method called increment() in your View class, which adds 1 to a member variable in the class. In your template HTML, add the event:click attribute on the button element.
<button event:click="increment()"/>.
Each time the button is clicked, the increment method is called and the value of the variable goes up by one.
Since Flavour expressions are mostly a superset of Java expression syntax, you can pass values to a method. For example, in a std:foreach body, where you are handling an item from a list, you can pass that item to the method. If you had a list of books, and the foreach variable name (var) was "book", you could make a button and pass "book" as a parameter, and the invoked method would receive the right book object for that button.
You could even go further and build more logic into the expression. You could build conditional logic and do different things based on state fetched from the View class. However, the same guidance applies here as elsewhere: try to place as much logic in the Java code as possible, where it is easily tested and edited. If you find yourself needing more complex logic, move it to a new method in your View class, and call that one method from a simple expression in the HTML template.
One more feature of event:click is that the lambda is passed the DOM click event. Often you can just ignore it, and let the called method act without knowing more details about the event. But in some cases you may want to know more specifics about the click: the precise coordinates, what modifier keys were pressed, etc. In that case, declare the event parameter for the lambda and pass it to the invoked method. For example, you could add a click event on a canvas. In the expression, declare the event parameter and pass it to a method in the View class. The called method could look at the coordinates in the event, and draw pixels or lines based on the events received.
5.5.1 Click Handler Styles
When implementing the Java method to handle a click, the simplest case is to invoke a method from your template:
<button event:click="increment()"/>.
Then implement that method in the class bound to that template:
public void increment() {
  counter++;  // Implement increment logic here
}
Sometimes you need information about the click event, such as which buttons were clicked or which modifier keys were pressed at the time of the event (Shift, Ctrl, etc.). To access this information, pass the event from the template using the full lambda syntax, and add a corresponding event parameter to your Java method:
<button event:click="event -> handle(event)"/>.
An example method with an extra event parameter, that reports on the console the status of the shift key when the click occurred.
public void handle(MouseEvent event) {
  System.out.println("Shift was "
    + (event.getShiftKey() ? "pressed" : "not pressed")
    + " during click");
}
5.6 attr component
🔊 Audio: Flavourcast S1 E9 attr component
The attribute component, spelled 'attr' in your templates, allows any attribute to be injected to an HTML element. This lets you add and customize attributes wherever needed.
Take, for example, the 'class' attribute. It is common to make styling on the page conditional. Say you were making a list of books, and you wanted to style them differently based on whether you had read them or not. You could apply styling to the div containing the book, and change the class based on the field 'unread'.
Specifically, you could add attr:class to the div with an expression picking the book-unread style if it's unread, and the book-read style if not. The HTML would be
<div attr:class="book.unread ? 'book-unread' : 'book-read'">
If the book's unread value is true, the HTML will say class='book-unread'. If the book's unread value is false, the HTML will say class='book-read'. Then you just need to declare your CSS styles as desired, and you'll easily see which books are read and which are unread. Note that in a Flavour expression, use single-quotes for string literals, like the CSS class in the example earlier, 'book-unread'.
In this example, we used attribute class to set the class attribute. However, the attribute component accepts anything after the colon, and injects and attribute with that name. If we want to add a style attribute, say attr:style. Want to make an ID dynamic? Add attr:id. Any time you need to add an attribute that is defined by code, you can use the attribute component.
6 Expressions
Flavour templates support an expression language inside double-quoted template parameters. Flavour expressions are very powerful, supporting most Java syntax as well as several additions specially for web development. Arithmetic on numbers, string concatenation, method invocation, and more are all supported. If you've read this far, you are probably familiar with Java syntax. There are better resources for it already, like the Java Language Specification (JLS), so I won't cover the parts of Flavour expressions that match Java expressions.
However, Flavour expressions do contain a few deviations from standard Java syntax. Some are for convenience, and some are due to the fact they are embedded in HTML templates. Let's look at those.
6.1 Differences from Java Expressions
First, strings can be specified using single-quotes. For example, from the section on the attribute component:
<div attr:class="book.unread ? 'book-unread' : 'book-read'">
shows how the class strings, like 'book-unread', use single-quotes.
This is necessary since Flavour expressions are contained within
double-quotes, which would otherwise require awkward escaping.
In expressions where a return value is expected, Flavour knows to interpret names as JavaBeans getters. For example, from the std:foreach section, we have this snippet of code:
<html:text value="book.title"/>
Flavour translates the string book into a call to the method
getBook() on the View class. Then it takes the returned object and
invokes getTitle() on that.
Some expressions are Consumers, accepting values. For example,
html:change allows you to say which Java method should be called
when an HTML input element changes. If you put this in your template:
<input type="text" html:change="name"/>
Each time the user changes the field (and navigates out), Flavour calls
setName(), passing in the value from the input to the method.
For comparisons, there are alternatives to some standard operators
that would use < or > and conflict with HTML's use of those
characters:
>can be writtengt<can be writtenlt>=can be writtengoe<=can be writtenloe
6.2 Importing Classes and Enums
Expressions look similar to Java code. Like in Java, using classes
and enums requires importing them. Say you're writing a fitness
tracker, and you want to track 2 types of events, Meal and
Workout. You create an enum in your model package
com.fitness.model.EventType. If you want to use this enum in a
expression in your Flavour HTML template, you must import the type as
follows. This should be at the top of your template, just like a Java
import statement:
<?import com.fitness.model.EventType ?>
This allows the template to use all types from the
com.fitness.model.EventType enum. Let's say you wanted to check if
an event was a workout. If your class Event has a type field called
type, you could use a condition like the following in the template:
<std:if condition="Workout == event.type">
Note that once imported, the enum name (EventType) is not required,
you can simply use the enum value directly (Workout).
6.3 A General Recommendation for Expressions
Expressions are powerful. You can build complex logic in them. You may be tempted to place logic in expressions, keeping your Java code shorter and simpler. Instead, I would advise the opposite: Keep your expressions as simple as possible, invoking Java methods for anything more complex than a couple operators. Let me explain the rationale behind these recommendations.
First, Java has great options for unit testing (like JUnit) and mutation testing (like PIT). It is easy to gain confidence that your code is well-tested. Logic in expressions, by contrast, requires integration testing using a framework like Selenium. These take more effort to build and maintain, and take longer to run.
Second, syntax highlighting and IDE support are better for Java code than Flavour expressions. It's easy to understand code with syntax highlighting. And auto-complete of Java syntax makes coding the Java View classes easier. In current IDEs, Flavour expressions show up in one color, with no auto-complete. While there is a NetBeans plugin to make some aspects of Flavour development easier, it doesn't yet help with expressions.
7 Handling Input
Handling input is what sets a static web page apart from an
interactive web application. While earlier chapters touched on some
input handling (like html:bidir-value for text inputs and
event:click), this chapter dives deep into all of the types of HTML
input components.
7.1 input type="text"
A text input lets the user enter arbitrary text. It is useful for entering names, descriptions, cities, and much more. It allows some basic enforcement via HTML attributes, or you can add Java logic to perform application-specific validation.
Here's an example of a text field configured as follows:
- a displayed width of 20 characters
- a maximum entered string length of 30 characters
- bound to the
nameattribute
<input type="text" size="20" maxlength="30" html:bidir-value="name"/>
In the Java class bound to this component, you'll need a standard JavaBeans getter and setter for the name attribute:
@BindTemplate("templates/singleLineText.html")
class SingleLineTextView {
  private String text = "";

  public String getText() {
    return text;
  }

  public void setText(String text) {
    this.text = text;
  }
}
7.2 input type="radio"
When users have a choice of one option among many, and you want all options to be visible, radio butons are a natural choice.
Named after buttons on car radios from the mid- to late-twentieth century, pressing one button selects it and deselects all others in its group. For example, picking a day of the week for a one-time event.
To create a radio button, start with the HTML, radioButtons.html:
<input type="radio" name="color" id="red" html:change="color" value="red"/><label for="red">Red</label><br>
<input type="radio" name="color" id="white" html:change="color" value="white"/><label for="white">White</label><br>
By using the same name for each radio button, they are grouped and only one can be selected at a time.
In the simplest version of the Java class, you can use a string to store the color:
@BindTemplate("templates/radioButtons.html")
class RadioButtonsView {
  private String color;

  public String getColor() {
    return color;
  }

  public void setColor(String color) {
    this.color = color;
    Templates.update();
  }
}
This will record the selected color as a string.
For more type safety, you can make color an enum, and have
getColor use toString() and setColor use the enum’s valueOf()
method to convert between the enum and a string.
8 Events
Handling events makes your app interactive. We’ve already seen some
events and how to install them on page elements. event:click, for
example, let’s you react to clicks on any component, from a button, to
text, to an entire div.
In this section we’ll explore the full range of events available in Flavour. We’ll look at mouse events, keyboard events, and input events. For each we’ll see how to learn more about details about the events. For key events we’ll learn how to know which modifiers were pressed (like the shift key). For mouse events we’ll learn how to determine which mouse button was used and the coordinates of the mouse pointer or tap location.
8.1 All Flavour Events
These are all the Flavour events, grouped into categories. All are
installed via the same event:{type} attribute, like event:click or
event:keypress.
- Mouse Events
- click
- dblclick
- mouseup
- mousedown
- Key Events
- keypress
- keydown
- keyup
- Miscellaneous events
- change
- blur
- focus
- submit
- reset
- input
8.2 Basic Handling
To invoke a method in the view class when an event is fired, simply
invoke the method from the event attribute value. For example, to
call handleClick() on a click event, add this attribute to an
element:
<button event:click=”handleClick()”>Click Me!</button>
handleClick() will get invoked each time the button is clicked.
Often this is sufficient. Sometimes you’ll need more information
about the event that caused your method to be invoked. Then you can
use an alternate syntax in the attribute and add a parameter to the
method.
The attribute syntax looks like this:
<button event:click=”event -> handleClick(event)”>Click Me!</button>
This will pass the event object to the handleClick() method, so it
needs a parameter to accept the event. For events generated from
using the mouse, the parameter type should be MouseEvent, like this:
public void handleClick(MouseEvent mouseEvent) {
  // Use mouseEvent fields here
}
8.3 Mouse Events
Mouse events are of type MouseEvent, and include several useful methods:
getButton(): returns the number of the button pressed during the eventgetShiftKey(),getAltKey(),getCtrlKey(),getMetaKey(): Detect if the modifier key was held during the event
More methods exist, corresponding to the methods in the standard MouseEvent Web API.
8.4 Key Events
Key events are of type KeyEvent, and include several useful methods:
getKey(): get a string identifying the key pressed (like “Enter” or “a”)isShiftKey(),isAltKey(),isCtrlKey(),isMetaKey(): Detect if the modifier key was held during the event
More methods exist, corresponding to the methods in the standard KeyboardEvent Web API.
8.5 Miscellaneous Events
The miscellaneous events listed generate Event objects. The most
useful method is getTarget(), which gives you the HTMLElement
where this event was generated. You can cast it to a more specific
type, like HTMLInputElement, if you know the type of element
generating the events.
9 Routing
Routing is a Flavour feature that lets your single-page app support page changes with updating URLs and back button support. That's actually a strange sentence. A 'single-page app' containing 'page changes'? Let me explain.
9.1 Page Changes in a Single-Page App
When you build a Flavour app, you end up with just a few files, the
main ones being index.html and teavm/classes.js. index.html is just
the launcher for the main application. All of the rest of your code
and templates is in classes.js. When the browser visits index.html,
that is the "single page" in your single-page app. From the browser's
perspective, you are on that page and stay there. However, Flavour
code can manipulate the page contents. Smaller changes can be made
with tags like std:if. Or you can use routing to have Flavour erase
everything on the page and replace it with another template. To your
users, it looks like a page change. But to the browser, it's still
the same old index.html, with some JavaScript code making big
changes to the page DOM.
9.2 Example: Roller Coaster Website
Let's say you're building a website listing roller coasters from around the world. You might have a main page, with a list of all of the roller coasters by name. Each name should be a link that takes you to a detail page with more information about that roller coaster. To implement that in Flavour, you'd have three templates, each with a corresponding View class, and a Route interface declaring the available routes (pages) in the app.
9.2.1 Client
First off, the main View class, Client, would be bound to a small
template client.html
<div>
  <std:insert fragment="content"/>
</div>
In the corresponding View class Client.java, the main() method will set up the Routing using code like this:
@BindTemplate("templates/client.html")
public class Client extends ApplicationTemplate implements ClientRoute {

  public static void main(String[] args) {
    Client client = new Client();
    new RouteBinder()
            .withDefault(ClientRoute.class, r -> r.index())
            .add(client)
            .update();
    client.bind("application-content");
  }
9.2.2 ClientRoute
The ClientRoute interface has a method for each different route
(page) in the app. We specify the path, and declare any parameters in
the path using {} and coresponding PathParameter annotations.
Here's what that would look like:
@PathSet
interface ClientRoute extends Route {
  @Path("/")
  void index();

  @Path("/coaster/{id}")
  void coaster(@PathParameter("id") String id);
}
You implement this interface in Client.java. The implementations
use setView() to switch the app to the new view.
public class Client extends ApplicationTemplate implements ClientRoute {

  @Override
  public void index() {
    setView(new IndexView());
  }

  @Override
  public void coaster(String id) {
    setView(new CoasterView(id));
  }
9.2.3 IndexView
Then you need the templates for your two pages. First, the main
listing page that you see first, called index.html:
<div>
  <h1>Coaster Listing</h1>
  <ul>
    <std:foreach var="coaster" in="coasters">
      <li event:click="handleClick(coaster)"><html:text value="coaster.name"/></li>
    </std:foreach>
  </ul>
</div>
and the View class IndexView.java. Note how the template makes a
clickable list item for each coaster. The name is shown, and the
click event calls a method in the View class to navigate to the
specific page for that coaster, as seen in the View class below.
@BindTemplate("templates/index.html")
public class IndexView {
  public List<Coaster> getCoasters() {
    return State.getAllCoasters();
  }

  public void handleClick(Coaster coaster) {
    Routing.open(ClientRoute.class).coaster(coaster.getId());
  }
}
9.2.4 CoasterView
Second, you could have the detail page coaster.html.
<div>
  <h1>
    <html:text value="coaster.name"/>
  </h1>
  Built in <html:text value="coaster.yearBuilt"/>
</div>
And its View class, CoasterView.java:
@BindTemplate("templates/coaster.html")
public class CoasterView {
  private final String id;

  public CoasterView(String id) {
    this.id = id;
  }

  public Coaster getCoaster() {
    return State.getCoasters(id);
  }
}
9.3 Routing Nuances
Routing has a few aspects that deserve deeper discussion.
9.3.1 Deep Linking
First off is deep linking and order independence. As we saw earlier, routing gives pages in your app unique URLs. This lets the user see the URL changing in the address bar as they navigate the app. It also allows users to bookmark specific pages in your app for direct access or sharing. This is a very powerful and useful feature of your app. In our example roller coaster application, individual coasters each have their own page with unique URLs. If one user shares a link, the recipient can open the link and see the same page, not just the home page for the single-page app.
To ensure deep linking works as expected, you have to make sure that your app doesn't depend on the order pages are visited. Specifically, when showing a detail page, don't assume that the user has visited other pages first. Be sure to load all resources needed by the page. If you have a shared cache of data, make sure a request for a specific item (like one coaster) works even if the full list hasn't been retrieved.
For example, an app that would break on deep links might load all coasters into a cache when the main coaster listing page is shown. Then the detail pages could just read directly from the cache, assuming that the cache was filled in when the user started out on the listing page. With deep linking, a user could launch the app and go straight to the detail page. The cache lookup would fail and the detail page would be incomplete, broken from the user's perspective.
To avoid this trap, make sure all cache lookups have a fallback to pull data from a canonical data source, often a server. If you have a small amount of data, load it all in the first time the cache is accessed, no matter which method is called. If you have a larger amount of data, make sure the cache is read-through, pulling data from the canonical source on demand as items are accessed.
9.3.2 Parameter Patterns
In some cases, you might want to have URLs that match only a specific
pattern for a String parameter. The Pattern annotation allows you
to specify a regex that must match in order for the path to match.
For example, if you wanted to match a first name and last name using
letters from a to z, separated by exactly one underscore, you could
specify your ClientRoute interface as follows:
@Path("/search/{name}")
void search(@Pattern("[A-Za-z]+(_+[A-Za-z]+)?") @PathParameter("name") String name);
9.3.3 URL Style
Another nuance of routing is URL style. The default style is hash-based routing, which adds the route path at the end of the app URL, after a hash (#) symbol. For example, our coaster app's two routes (declared in 9.2.2) might look like:
Starting in Flavour version 0.3.0, a new routing style is supported: path-based routing. It gets rid of the hash in URLs. For example:
9.3.4 Path-based Routing
Path-based routing has several benefits:
- Google does not index hash-based links, rendering most such Flavour pages invisible to Google
- Some users prefer URLs that are more 'readable'
- Google Analytics tracks path-based routes by default, and ignores hash-based routes
To enable path-based routing, you need to make 3 changes. First, at
the start of your main() method, add a call to
Routing.usePathStrategy():
public static void main(String[] args) {
  Routing.usePathStrategy();
Next, if your app is deployed somewhere other than the root path of your
server, set the base URI in index.html to match your application
deployed location. If your app is deployed at https://example.com/myapp:
<head>
  <base href="https://example.com/myapp" />
(By contrast, if your application is deployed on the root path (like https://example.com/), setting
the base URL is optional.)
If you are deploying your app on a JSP-enabled application
server like Apache Tomcat, you can consider using environment
variables (via System.getenv()) or pageContext.request to let your
app work in different environments without building several versions
of the app, one per URL. For more details, see the JSP and JSTL
specs:
https://jakarta.ee/specifications/expression-language/5.0/jakarta-expression-language-spec-5.0
and
https://jakarta.ee/specifications/tags/3.0/jakarta-tags-spec-3.0.pdf
The steps above will make the app work for users coming in via the
main URL. However, one more step is required to enable deep linking.
In path-based routing, deep links use different paths from the
application home page. These different paths are not present in the
traditional sense (separate files in a folder structure), so the
application server will normally serve up error pages for them if the
user bookmarks deep links or shares them. To fix this, simply add
this code in your web.xml file (src/main/webapp/WEB-INF/web.xml):
<error-page>
  <location>/</location>
</error-page>
10 Background Activity
Java supports multithreaded development, and Flavour supports this too. Thanks to some ingenious work in TeaVM (which is the foundation for Flavour), the Java threading model is supported even though JavaScript is primarily a single-threaded system.
In the browser, events are handled on a single UI thread. When the user invokes an action that could take a while, it is necessary to perform the long-running action on a separate thread, to prevent the UI from becoming unresponsive. Say you are handling a click event. If the code is going to call a service or perform a lengthy computation, it should be run on a separate thread. Let's look at three ways you can do that in Flavour
10.1 async events
If handling an event is going to take a long time, you can use the async version. The async versions of events automatically execute the invoked code in a new Thread. For example, if you had to invoke a service as the result of a button click (say the button was to save data), you could write the following:
<button event:async-click="save()"/>
One note, if the called method changes data that is visible, you'll
have to invoke Templates.update() at the end to trigger a re-render.
10.2 Create a New Thread
Core Java threading classes and behavior are available, so you can
create a new Thread and start it running, just like you would in any
other Java program:
Thread threadBackground = new Thread({
  public void run() {
    // Do service call or long-running computation here
    Templates.update(); // Force a re-render,
                        // if you've changed data used on-screen
  }
}).start();
10.3 BackgroundWorker
If you need to run something in the background and automatically
trigger a re-render when complete, you can use BackgroundWorker. This
useful class executes a Runnable in the background, then calls
Templates.update() automatically upon completion. For example:
BackgroundWorker worker = new BackgroundWorker();
worker.run(() -> {
    // Do service call or long-running computation here
    // When the Runnable terminates, Templates.update() is called
});
11 Modal Dialogs
Sometimes you need to show information or ask for input that doesn't require a full page change, or a navigable URL. For example, you may want to ask for a small bit of information. There is no need to make this a full page with a bookmarkable URL. You just want to briefly pause the app for a quick interaction. In this case, you'll need a modal dialog, so-called because it switches modes of the app to one in which the dialog is the only usable part.
11.1 Popup.showModal(), PopupContent, and PopupDelegate
The way to show a modal is via Popup.showModal(). This method takes
a view instance and shows it in a modal dialog. Popup.showModal() is
blocking, it won't return until the dialog has been closed or
dismissed.
The view instance must implement the PopupContent interface. This
allows the popup framework code to provide a PopupDelegate to your
code, which allows your code to close the dialog when desired. Once
the user clicks OK, or uses another method to dismiss the modal
dialog, call delegate.close().
The final, critical part of calling Popup.showModal() is that it
must be called from a background thread. So if you are trying to show
a popup in response to user interaction (which is often the case),
wrap the showModal() call in a BackgroundWorker.run(), see the
example below.
11.2 Styling
Because a modal dialog has to pop up on top of other content, it needs
special styling (CSS). The Flavour framework depends on several
styles to be defined to style the modal dialogs correctly. The
easiest way to set these styles is add the Bootstrap CSS to your
page's head element:
<link rel="stylesheet"
   href="https://maxcdn.bootstrapcdn.com/bootstrap/3.3.7/css/bootstrap.min.css"
   integrity="sha384-BVYiiSIFeK1dGmJRAkycuHAHRg32OmUcww7on3RYdg4Va+PmSTsz/K68vbdEjh4u"
   crossorigin="anonymous">
However, Flavour modal dialogs only need rules for a few classes,
listed below. If you want to customize your dialog's appearance, or
simply don't want to pull in all of Bootstrap (or add a dependency),
simply define rules for these classes in your app.css.
- modal
- modal-dialog
- modal-content
- modal-header
- modal-body
- close
11.3 Example
PopupView:
@BindTemplate("templates/popup.html")
public class PopupView implements PopupContent {
  private PopupDelegate delegate;

  @Override
  public void setDelegate(PopupDelegate delegate) {
    this.delegate = delegate;
  }

  public void save() {
    // Save first
    // Then close the dialog
    delegate.close();
  }
}
Showing the popup:
new BackgroundWorker().run(() -> {
  Popup.showModal(new PopupView());
});
12 Service Calls
Some single-page apps don't need to communicate with a server. For example, a single-player game like Wordii is implemented without any server communication (after the initial HTML, CSS, and JS files are downloaded).
However, the majority of apps need to communicate with a server. Data needs to be fetched. Changes need to be saved. Credentials need to be checked. All of these require server communication.
12.1 JSON over HTTP
As of this writing, a common technique for server communication is RESTful calls containing JSON payloads. The HTTP implementation of the REST paradigm centers on four actions (formally known as request methods):
- GET: Retrieve a document
- POST: Create or update a document
- PUT: Create a document
- DELETE: Delete a document
For the first three of these actions, data is an input, output, or both. A common choice for the data format is JSON. Flavour has JSON support, so it can translate objects being passed to or from a service call to JSON and back as needed. As a result, your code needs only deal with Java objects.
12.2 Invoking a JAX-RS JSON Service
Flavour works with standard JAX-RS web services. (The JAX-RS standard
for RESTful web services is defined here.) Let's say you have a
JAX-RS service for fetching a list of roller coasters. The service is
running on example.com, and the service is defined in the interface
CoasterService.java. CoasterService.java might have service methods
declared:
@Resource
@Path("/")
public interface CoasterService {
  @Path("coasters")
  @Produces("application/json")
  @GET
  CoasterListing getCoasters();
The @Resource annotation indicates this is a Flavour-ready service.
The @Path annotation tells the server and client code which URL to
use for this endpoint. The @Produces annotation tells the server
which format to use for the returned value. @GET indicates the HTTP
action supported for this endpoint. And CoasterListing is the type of
object returned (via JSON) when this endpoint is accessed.
CoasterListing and all other classes returned to a Flavour client must
be annotated with @JsonPersistable, like this:
@JsonPersistable
public class CoasterListing {
On the server side, the interface CoasterService would have an
implementation that retrieves the coaster list (likely from a
database), and returns it. A JAX-RS implementation (like Jersey)
takes care of replying to the specified requests (GETs to the right
path), and converting the response object from a Java instance to
JSON.
12.3 Creating and Using The Client-Side Service Facade
On the client side, Flavour makes invoking this method as easy as possible. First, you use the RESTFactory to create a client-side instance of the interface:
CoasterService service = RESTClient.factory(CoasterService.class).createResource("api");
Most of this line is fairly straightforward. We're asking for an
implementation of the CoasterService that we can call. The one tricky
part is "api", which is the path on the server where the RESTful API
is available. This has to match the path used when deploying your API.
The implementation of the service that is returned is a facade. It looks like the real service, but when called, all it does is invoke the remote service. It takes care of converting outgoing and incoming objects to and from JSON, a process known as marshalling and unmarshalling.
Now that you have the service instance, you can call its methods as if the service was local. So getting the list of coasters from our app is as easy as this:
CoasterListing coasterListing = service.getCoasters();
That's it! If the call to the server is successful, coasterListing will have the coasters fetched from the server, ready to use as a Java object.
Remember that if you are making a service call in response to a user action, you'll have to use one of the techniques from the chapter Background Activity to ensure the UI isn't blocked.
12.4 Error Handling
If service calls always completed successfully, web apps would be a lot easier. In real life, unfortunately, users will experience service failures, despite our best efforts:
- WiFi drops
- Cellular dead zones (tunnels, buildings, etc.)
- Airplane mode
- Server outages
- Service bugs
Your app should be ready for the possibility that the service call won't complete successfully, in which case you will get an exception. How to handle the exception will depend on your application. If it can be retried automatically or safely ignored, you may not need to alert the user. However, if the user is expecting to see new information or a save confirmation, you'll need to let them know what to do next to accomplish their goal. Here's a minimum exception handler that uses the unappealing browser dialog to let the user know something went wrong:
try {
  coasterListing = service.getCoasters();
  Templates.update(); // Re-render to show the coasters on success
} catch (Exception xpt) {
  Window.alert("Error: Could not load the coaster list.  Please try again later.");
}
13 Custom Components
Flavour lets you define your own components, allowing reuse, consistency, and sharing of elements and code. There are two kinds of custom components, element components and attribute components. Element components are complete elements added to a page. They can contain other elements, either normal HTML or other, nested element components. By contrast, attribute components are attributes added to other elements. They can serve as mixins, adding to or modifying other elements. Let's look at them in more detail.
A custom element component, like a page template, consists of a paired HTML
templates and View class. Unlike a page template, component
parameters are passed as HTML attributes. To mark a View class as
a custom element component, use the BindElement annotation. The standard components
(html:text, std:foreach, etc.) are components implemented in the
Flavour framework using the same APIs available to you to implement
your own components.
A custom attribute component does not have a template. It is only a
View class with a BindAttributeComponent annotation. An attribute
component is always added to an element, which it can modify or
enhance. It serves as a mixin, allowing additional behavior to be
added to an element. For example, you could create an attribute
component to add cancel functionality via the escape key.
13.1 Example Element Component: Coaster Tile
In the coaster summary page, each coaster is shown in a list. Let's create a reusable component to show a roller coaster summary, including making the whole tile a link to the roller coaster details page.
13.1.1 coasterTile.html
Let's start with the template. Just like page templates, component templates are HTML with Flavour components and expressions. Here's coasterTile.html:
<div class="coaster-tile" event:click="handleClick(coaster)">
  <h2><html:text value="coaster.name"/></h2>
  Built in <html:text value="coaster.yearBuilt"/>
</div>
The entire tile is contained in a div. We assign it a CSS class so we
can style the tile later. We set up a click event handler to call a
method on the view class. In the second and third lines, we show the
name in a heading and the year built. We use the JavaBean property
coaster several times, so we'll have to implement getCoaster() in
the View class.
13.1.2 CoasterTileComponent.java
Let's look at it next. CoasterTileComponent.java is conceptually related
to the view classes we've seen before, with a few differences unique
to components.
@BindTemplate("component/coasterTile.html")
@BindElement(name = "coastertile")
public class CoasterTileComponent extends AbstractWidget {

  private Supplier<Coaster> supplierCoaster;

  public CoasterTileComponent(Slot slot) {
    super(slot);
  }

  @BindAttribute(name = "coaster")
  public void setCoasterSupplier(Supplier<Coaster> supplierCoaster) {
    this.supplierCoaster = supplierCoaster;
  }

  public Coaster getCoaster() {
    return supplierCoaster.get();
  }

  public void handleClick(Coaster coaster) {
    Routing.open(ClientRoute.class).coaster(coaster.getId());
  }
}
Starting from the top, the first new thing we see is BindElement.
This is how you declare the HTML name for your component. You'll use
that name when using your component in an HTML template. Note that
the name must be all lowercase.
Next we'll look at coaster parameter to this component. When you want
to add a coaster tile to a page, you have to tell the component which
coaster to show in the tile. The field supplierCoaster and its
setter setSupplierCoaster() provide this functionality. The new
annotation BindAttribute lets you specify the name to be used in
HTML templates.
Components should extend AbstractWidget and pass through Slot to
super() in their constructor.
In the component template we will want to access the properties of the
coaster, so we'll implement getCoaster(). We are going to return
the coaster provided to us from the page that created us. Since it
passed in the coaster to use via supplierCoaster, we invoke its
get() method.
Important Note: You may be tempted to cache the result of
supplierCoaster.get(), recording the Coaster in a member field of your
Component class. Do not do this. Flavour may reuse your component
instance, but if the Coaster changes, the supplier get() call will start
returning a different object. If you have cached the Coaster, you
won't see the change and your component will show old information.
This can cause some subtle refresh issues. Once again, call
supplier.get() everywhere, don't cache the result for future use.
13.1.3 Repository
Components must be listed in a repository based on the component
class' package. In this case,
src/main/resources/META-INF/flavour/component-packages/com.example.
Each component's class name goes on a separate line.
CoasterTileComponent
13.1.4 indexTiles.html
Finally, we'll see a template (indexTiles.html) showing how to embed
the component.
<?use coaster:com.example ?>

<div>
  <h1>Tiled Coaster Listing</h1>
  <div class="coaster-tile-container">
    <std:foreach var="coaster" in="coasters">
      <coaster:coastertile coaster="coaster"/>
    </std:foreach>
  </div>
</div>
The use line at the top of the template imports the components from
the com.example package, and gives them the namespace coaster. Then
inside the std:foreach element, we can use the coastertile component
(declared earlier in 13.1.2) in that coaster
namespace. We also pass the current coaster from the foreach loop as
the coaster parameter (coaster="coaster").
13.1.5 app.css
We declared 2 styles in the templates above. We add them in
app.css.
.coaster-tile {
  border: black 1px solid;
}

.coaster-tile-container {
  display: flex;
}
The first style gives a border around the tiles. The second uses flexbox for the coaster tile container so they can flow to fill different-sized screens.
13.2 Component Contents
Components can use the content provided, allowing you to make wrapper
or container-type components. Let's say you're creating a component
where you want the caller to provide a chunk of HTML. First, in your
View class, make a setter that is annotated with @BindContent.
@BindContent
public void setContent(Fragment content) {
  this.content = content;
}

public Fragment getContent() {
  return content;
}
Next, use the content in your template, placing it where you want the provided content to appear:
<!-- adds the caller's content -->
<std:insert fragment="content"/>
The callers can provide content to be used inside your component:
<example:component>
  <h1>Caller's Content to be used in your component</h1>
</example:component>
13.3 Optional Parameters
Usually parameters are mandatory and they will be checked by Flavour,
producing a compile-time error when missing. However, perhaps you
want a component parameter to be optional. Then you simply add the
@OptionalBinding annotation. Callers can omit the parameter without
any compile-time error. Now it is up to you to handle the case when
the parameter is not provided.
An example of an optional parameter is the index parameter from the
std:foreach component. This is a snippet from its source code.
@BindAttribute(name = "index")
@OptionalBinding
public int getIndexVariable() {
13.4 Event Handlers
You may find yourself wanting to add an event handler attribute to a
component. In this example, we're building a button for a UI
component library. The component is supposed to show everything in
bold, and allow the caller to provide their own event handler. In
the component template, you can add the event:click handler on
the button element (bolded, per requirements). The event:click
handler calls handleClick, passing in the MouseEvent.
<b><button event:click="(event) -> handleClick(event)"><std:insert fragment="content"/></button></b>
In the component class bound to the template, you'll have to declare the MouseEvent Consumer attribute, store it, and call it when handleClick is invoked by Flavour:
private Supplier<Consumer<MouseEvent>> supplierConsumerMouseEvent;

@BindAttribute(name = "click")
public void setConsumerMouseEvent(Supplier<Consumer<MouseEvent>> supplierConsumerMouseEvent) {
  this.supplierConsumerMouseEvent = supplierConsumerMouseEvent;
}

public void handleClick(MouseEvent event) {
  supplierConsumerMouseEvent.get().accept(event);
}
For users of your component, things are even easier. Here's an example of a template using the bold button component we have created. First, the template, showing how to pass in the click handler:
<?use boldbutton:com.frequal.teasampler.boldbutton ?>
  <boldbutton:button click="handleClick()">Click Me, I'm a Component!</boldbutton:button>
Finally, the View class bound to this template returns a MouseEvent
consumer from handleClick(). The event-consuming method is where
business logic can be added. In this case we're simply incrementing a
counter.
public Consumer<MouseEvent> handleClick() {
  return (event) -> {
    clickCount++;
  };
}
And that's it! You've created a clickable component, and used it on a page that provided its own event handler to react to the clicks.
13.5 Inner Components
You can place components inside other components without any special
steps. However, sometimes you may find that the parent needs to know
about, or even enforce, the presence of certain children. For this,
you can use @BindElement on a setter to specify which children
should be present and get a reference to them. For example, the
std:choose component lets you pick between several options, like
chained if statements. Here is the relevant code from
ChooseComponent:
@BindElement(name = "choose")
public class ChooseComponent extends AbstractComponent {
[...]

    @BindElement(name = "option")
    public void setClauses(List<ChooseClause> clauses) {
[...]

    @BindElement(name = "otherwise")
    @OptionalBinding
    public void setOtherwiseClause(OtherwiseClause otherwiseClause) {
The @BindElement on setClauses lets you pass in multiple
std:option children. Note that for multiple children, you should
accept a List type in the setter.
The @BindElement on setOtherwiseClause accepts at most one
OtherwiseClause. The @OptionalBinding means that a template
without it will still compile.
13.6 Multiple Names
Sometimes you may need one component to have multiple names. The
attr component is an example, it can have any name and the component
uses the provided name to set that attribute on its element. (Like
attr:class to set the class attribute.) In the Flavour source code
we can see it as follows:
@BindAttributeComponent(name = "*")
public class ComputedAttribute implements Renderable {
[...]
    @BindElementName
    public void setName(String name) {
Since @BindAttributeComponent is passed the name *, any name used
with the attr namespace for an attribute causes this component to be
used. To know which name was used, we can use @BindElementName
annotation on a setter accepting a String.
Another example is in event handling. Flavour includes attribute
components to let you specify event handlers. There are many kinds of
events, but they are all handled by the same component.
event:click, event:mousedown, and more are handled by MouseEvent,
which lists the supported names as you can see here:
@BindAttributeComponent(name = { "click", "dblclick", "mouseup", "mousedown" })
public class MouseBinder extends BaseEventBinder<MouseEvent> {
13.7 Attribute Custom Components
[Note: This example is heavily influenced by the escape handling in konsoletyper's TodoMVC example project]
For inputs it is often useful for the user to cancel input, reverting to the previous state. If you have several input components for which you want consistent cancel behavior, you have several choices;
- Add key event listeners to each individually
- Create an element component and reuse it, possibly via subclassing if you need different behavior in the different inputs
- Create an attribute component invoking the cancel logic and add it to each input
The first option, adding key listeners to each component individually, is repetitive and creates a lot of duplicated code. Plus, if you want to change the behavior in all inputs, you'll have to make the change multiple times.
The second option, creating an element component, can work in limited cases, if you have a small number of components. However, it is limiting since all subtypes have to share the same behavior. What if you have some that need escape handling, and some that need another behavior, and some that need both?
The third option, the attribute component, lets you define behavior on a target component, and add it via an HTML attribute. You can potentially add multiple attributes to an element, mixing and matching the behaviors you want. The rest of this section will describe how to implement escape key handling using an attribute component.
13.7.1 Example: CancelComponent.java
To allow the user to cancel editing via the Escape key, we need to be
able to add a key listener when the component is created, remove it
when the component is destroyed, and invoke custom behavior when
escape is pressed. In an attribute component, this involves
registering a key listener event when the component's render()
method is invoked, removing the key listener when destroy() is
called, and having the event handler invoke the custom logic provided
as the attribute's value. The event handler also restores the
original value to the input component after canel is pressed. Here's
what that looks like in the Java component code:
@BindAttributeComponent(name = "cancel")
public class CancelComponent implements Renderable {
  static private final int KEYCODE_ESCAPE = 27;
  private final ModifierTarget target;
  private Runnable runnable;
  private String strOriginal;
  private EventListener<KeyboardEvent> listener = new EventListener<KeyboardEvent>() {
    @Override
    public void handleEvent(KeyboardEvent event) {
      if (KEYCODE_ESCAPE == event.getKeyCode()) {
        runnable.run();
        ((HTMLInputElement) event.getTarget()).setValue(strOriginal);
        Templates.update();
      }
    }
  };

  public CancelComponent(ModifierTarget target) {
    this.target = target;
  }

  @BindContent
  public void setRunnable(final Runnable runnable) {
    this.runnable = runnable;
  }

  @Override
  public void render() {
    target.getElement().addEventListener("keydown", listener);
    strOriginal = target.getValue();
  }

  @Override
  public void destroy() {
    target.getElement().removeEventListener("keydown", listener);
  }
}
This is the entry in the manifest file src/main/resources/META-INF/flavour/component-packages/com.frequal.teasampler.cancelcomponent
CancelComponent
13.7.2 Using the CancelComponent
And here's an example of using it. First, the template. We import
the component's package with the use statement. Then we provide the
method to invoke when the input is canceled via the sampler:cancel
attribute.
You can see we use an editing boolean value to control whether we
are showing the value as text or as an input.
<?use sampler:com.frequal.teasampler.cancelcomponent ?>
<div>

  <std:if condition="!editing">
    <div event:click="startEditing()">
      Name: <html:text value="name"/>
    </div>
  </std:if>

  <std:if condition="editing">
    Name: <input type="text"  sampler:cancel="cancel()" html:bidir-value="name"/>
  </std:if>

</div>
Finally, we provide the implementation of cancel() in the View class:
@BindTemplate("templates/cancel.html")
public class CancelComponentView extends SeeCodeView {
  private boolean editing = false;
  private String name = "Click here to edit this name";

  public boolean isEditing() {
    return editing;
  }

  public String getName() {
    return name;
  }

  public void setName(String name) {
    this.name = name;
    editing = false;
  }

  public void startEditing() {
    editing = true;
  }

  public void cancel() {
    editing = false;
  }
}
14 SVG
Scalable Vector Graphics, or SVG, is an XML dialect for vector drawing that you can use in web apps. It allows you to declare lines, shapes, colors, gradients, and more using XML elements and attributes. For example, you could make a red circle with radius 10 centered at the x, y coordinates 20, 20 as follows:
<svg>
  <circle cx="20" cy="20" r="10" fill="red" />
</svg>
SVG is composable, meaning you can declare a group of SVG elements, then reuse that group multiple times, moving or scaling it as needed. For example, you could use a brown line and a green triangle to make a simple evergreen tree. You could then use the tree group several times to make a forest from trees of varying sizes and positions.
<svg height="100" width="100">
  <defs>
    <g id="tree">
      <line x1="5" y1="10" x2="5" y2="20" style="stroke:brown; stroke-width:2" />
      <polygon points="5,0 10,12 0,12" style="fill:green" />
    </g>
  </defs>

  <use href="#tree" x="25" y="20" transform="scale(1.0)" />
  <use href="#tree" x="5" y="30" transform="scale(1.2)" />
  <use href="#tree" x="20" y="35" transform="scale(1.5)" />
</svg>
14.1 Custom SVG Flavour Component Example
By creating SVG groups as Flavour components, you gain even more flexibility and power. The trees in the example above could have widths and heights that vary independently. You could make a parameter for the species of tree and use std:choose to switch between the drawing styles. Let’s take a look at a simple example where the tree width, height, and color are parameters. (Note: SVG support is new in Flavour 0.3.0. If you are using 0.2.1 or earlier, make sure to upgrade first.)
First, we’ll create the TreeComponent. As we saw in the Custom
Component chapter, components consist of 2 parts, the template file
and the View class. In this case, the template file is SVG, and will
start with an <svg> opening tag. Then we’ll add the trunk (line)
and the triangle for the branches (polygon). For the branches,
several aspects will be controlled by parameters. The width of the
branches, and the color will use Flavour attribute tags, just like
we’ve seen before.
<svg>
  <g attr:transform="'translate(' + treeData.x + ',' + treeData.y + ')'">
    <line x1="10" attr:y1="10" x2="10" attr:y2="20" style="stroke:brown; stroke-width:2"></line>
    <polygon attr:points="'10,0 ' + (10 + treeData.width) + ',12 ' + (10 - treeData.width) + ',12'" attr:style="'fill:' + treeData.color"></polygon>
  </g>
</svg>
The template needs parameters, which come from the View class. This follows the same pattern as before, with the parameters injected via setter methods with Supplier inputs and @BindAttribute annotations. The View class is also bound to the SVG template by the @BindTemplate annotation.
@BindTemplate("component/tree.html")
@BindElement(name = "tree")
public class TreeComponent extends AbstractWidget {

  private Supplier<TreeData> supplierTreeData;

  public TreeComponent(Slot slot) {
    super(slot);
  }

  @BindAttribute(name = "treeData")
  public void setSupplierTreeData(Supplier<TreeData> supplierTreeData) {
    this.supplierTreeData = supplierTreeData;
  }
Finally, the View class has getters for the TreeData parameter, so the
template can read the tree configuration info.
  public TreeData getTreeData() {
    return supplierTreeData.get();
  }
}
Now we have a reusable tree template. Let’s use it to make a random forest. We’ll create another SVG template and View class called ForestComponent. When created, the View class will create a List of tree positions and colors. Then its template will loop over this list, creating a TreeComponent for each one.
Let’s start this time with the View class. Since we want the random tree locations to stay fixed during the app execution, we’ll compute the positions of the trees in the constructor. When the ForestComponent is added to the page, it will get constructed once, but it might be rendered multiple times. By recording the positions at construction time, the re-renders will show the trees in the same place each time. Instead, if we randomized the locations on each call to getTreeLocations(), the trees would move around! Perhaps an interesting effect, but not what we’re trying to achieve. Here’s the ForestComponent View class:
@BindTemplate("component/forest.html")
@BindElement(name = "forest")
public class ForestComponent extends AbstractWidget {

  private List<TreeData> listTrees;
  private Random random = new Random();

  public ForestComponent(Slot slot) {
    super(slot);
  }

  public List<TreeData> getTrees() {
    return populateTreeData();
  }

  synchronized private List<TreeData> populateTreeData() {
    if (null == listTrees) {
      makeTrees();
    }
    return listTrees;
  }

  private void makeTrees() {
    listTrees = new ArrayList<>();
    for (int i = 0; i < getTreeCount(); i++) {
      listTrees.add(makeTree());
    }
  }

  protected int getTreeCount() {
    return 10;
  }

  private TreeData makeTree() {
    return new TreeData(random.nextInt(90), random.nextInt(90), random.nextInt(15) + 5, "green");
  }

}
Next, let’s create the template for this forest component. The template will actually be relatively short. It simply needs to loop over the list of tree positions, creating one of the TreeComponents we created earlier. For each tree, we pass in the tree data (x, y, width, and color) from the current list item.
<?use sampler:com.frequal.teasampler.component ?>
<svg>
  <std:foreach var="treeData" in="trees">
    <sampler:tree treeData="treeData" />
  </std:foreach>
</svg>
Finally, let’s add the forest to an index.html:
<?use sampler:com.frequal.teasampler.component ?>

<div>
  <sampler:forest />
</div>
At this point, we have a random forest app. Each time you reload the
page, the app gets started over and the ForestComponent constructor
gets called again, so there is a new random forest.
14.2 Interactive Forest Size
So far, the forest app isn’t very interactive. The only control the user has is by reloading, which is neither user-friendly nor fine-grained. Instead, let’s introduce a slider to allow the user interactive control over the tree count.
We’ll work bottom-up. The TreeComponent doesn’t need to change, we’ll
just be creating more or less of them. The first component we need to
extend is ForestComponent. Earlier we hard-coded 10 trees. Instead,
let’s make the tree count a parameter, As before, this requires a
setter for the supplier, and a getter for the template to read the
value. The new code in ForestDynamicComponent is shown here:
@BindTemplate("component/forest.html")
@BindElement(name = "forestdynamic")
public class ForestDynamicComponent extends ForestComponent {

  private Supplier<Integer> supplierTreeCount;

  public ForestDynamicComponent(Slot slot) {
    super(slot);
  }

  @BindAttribute(name = "treeCount")
  public void setSupplierTreeCount(Supplier<Integer> supplierTreeCount) {
    this.supplierTreeCount = supplierTreeCount;
  }

  @Override
  protected int getTreeCount() {
    return supplierTreeCount.get();
  }

  @Override
  protected synchronized List<TreeData> populateTreeData() {
    listTrees = null;
    return super.populateTreeData();
  }
}
The first template works without changes.
Finally, we modify the client.html to introduce a slider bound to a
count parameter. That parameter is also used with the
ForestDynamicComponent, so that changes to the slider reflect in the forest
component.
<?use sampler:com.frequal.teasampler.component ?>
<div>
  <sampler:forestdynamic treeCount="treeCountInt"/>
  <input type="range" min="1" max="100" html:bidir-value="treeCount" event:input="(event) -> handleInput(event)" />
</div>
Now we have an interactive forest! Moving the slider causes the forest to re-render with more or fewer trees.
15 State
State management is important in making a single-page app responsive, correct, and offline-ready. Let’s look at the various aspects you should consider when planning your state management.
15.1 Fundamentals
First off, you can consider if you need state shared across pages. It is possible to make an app in which the constructor for each page template loads the data required from the server, and changes are committed before moving to the next page. This makes state management simpler. The state rarely becomes stale, since the relevant state is loaded on each page change.
However, I recommend that, in general, you look to cache state for reuse across pages. Much of the benefit of single-page apps is the speed of page changes. If you have the required state for the next page cached, you can show it immediately. Contrast this with traditional server-side rendering, where every page change requires you to wait for the server to respond. The difference in interactivity is noticeable.
Secondly, single-page apps have the possibility of working offline by caching data locally. If you have designed your app to work with a state cache, the transition to operating offline will be easier, since your cache can be initialized based on client-side information even if the server is unreachable.
15.2 All-at-once or On-demand
When you are first loading cache data from the server, you have a continuum of choices. For an app with a small amount of data, it may be possible to fetch all of the data the app needs from the server at once. For example, a to-do application may be able to fetch all items for a user and store them in the cache. Then page changes can refer to data in the cache, synchronizing with the server when possible in the background. In this example the server may have to-do items for many users, but any one user only should see their own to-do items, which can easily fit in client-side storage.
However, other categories of apps will have too much information for it to all be saved client-side. Take a mapping application, for example. The world map with roads and points of interest is too much to store client-side. A single-page mapping app could request the data for the currently-visible portion of the world at a given zoom level. It could, however, request additional adjacent map regions, so that subsequent scrolling could potentially render data that is already cached, if the fetch is faster than the scrolling. You could even analyze the rate and direction of scrolling and fetch the map data in the direction being scrolled, to maximize cache hit rates and minimize “loading” sections of the map.
15.3 Recording State on the Client
With Flavour you can use browser APIs, like access to Local Storage. You can also transform Java objects to and from JSON. Combining these two techniques, you can make state storage that persists across invocations of the app on a device. Say, for example, you were making a calorie-counting app. You could store the list of food eaten for each day in a Java object that you write to local storage after each change. When the State object is constructed, it cold read the food list back from local storage. This would let the user have a safe and secure history of their foods eaten that is stored only on their local device, no server storage required. No chance of hackers stealing your private eating data from a cloud server.
15.4 Technique 1: State Singleton
We’ve covered a lot of state design patterns and theory. Now let’s look at some specific techniques for implementing state in Flavour.
One straightforward way to store and reuse state is a State Singleton.
In many cases, singletons (one instance of a class in an entire VM) is
problematic. For server-side programming, singletons can be
problematic from a synchronization or multi-threading perspective,
since they can create bottlenecks for multi-threaded, multi-core
applications. However, on the client side, a browser instance is
working on behalf of just one user, and often is bound by the
single-core restrictions of the browser JavaScript engine. In this
environment, the Singleton State pattern can be very useful. If you
declare a Singleton via traditional means (either a static method to
fetch an instance or a public static final field), you can have one
State object you can fetch from any object in your app. For example,
you can declare a static method getInstance() in the State class
which returns an existing instance if it exists, or creates it
if this is the first time.
public class State {
  private static State instance = null;

  private String name;

  public synchronized static State getState() {
    if (null == instance) {
      instance = new State();
    }
    return instance;
  }

  public String getName() {
    return name;
  }

  public void setName(String name) {
    this.name = name;
  }
}
Each page can fetch the State, and any cached values from other pages
will be visible to the next page that uses it. Specifically, each
View class constructor can call and store State.getInstance(), or
fetch the singleton each time state is needed.
@BindTemplate("templates/stateSingleton.html")
public class StateSingletonView extends SeeCodeView {

  public String getName() {
    return State.getState().getName();
  }

  public void setName(final String name) {
    State.getState().setName(name);
  }
15.5 Technique 2: All-at-once Caching
Let’s return to our roller coaster app to talk about all-at-once versus on-demand caching. The number of roller coasters in the world is small enough that it can feasibly be held completely client-side. Let’s see what that would look like.
In the State class, our constructor could make a service call to
populate the local cache. Since a service call could take a while,
this needs to be done on a background thread. Since we can’t block
the UI, calls to get the coaster list should never fail or return
null, instead they should return an empty list. When the service call
returns, the background thread should call Templates.update(), which
forces a re-render. The calling page will ask the state for the
coaster list again, and then the coaster list will be populated.
15.6 Technique 3: On-demand Caching
Let’s continue the roller coaster example. Let’s say the listing page just shows a few key details of each coaster, but the full information will be downloaded each time the customer looks at a detail page. One way to implement this would be to have a State method getFullCoaster(String id) that returns the full coaster record. This would be called from the details page when the user navigates to ut by clicking on the coaster on the main listing page. Since the id is passed to the details page, it could get the State singleton, then request the full record.
The State.getFullCoaster() could use a map to cache fetched
coasters. It would first check the map for a coaster and return that
one if present. If the map doesn’t contain that full coaster record
yet, it would have to be fetched from the server. As before, a server
call can be slow and block the UI, so it must be performed on a
background thread. Then Templates.update() should be invoked after
the server call is complete and the map has the full details fetched
from the server. The details template page must be ready for either
case – getting a null back from getFullCoaster() (in which case it
could show “loading”), or getting a valid coaster, which can be shown
in all its glory. The first time the details page is rendered and it
will get back null from the State class, but when the full details
are loaded in the background by State.getFullDetails(), a page
re-render will occur and the coaster details will appear.
15.7 Technique 4: Local State Caching
Let’s return to the food tracker app. In this app, the state is stored fully client-side using local storage. The State should load from local storage at construction, and save to local storage as often as desired (probably after each edit to minimize data loss potential).
Let’s say all of the app data is stored in a Map, Each Map entry
contains a Day object as the key and a List<Food> as the value.
As long as each contained object (Day, Food) are marked with
@JsonPersistable, then the Flavour JSON class can convert it to JSON,
and then stringify() can be used to convert the data to a string.
In this way, the data can be saved in a LocalStorage, which could be
done every time the user enters a new Food. Here’s what that code
looks like:
private static void saveToLocalStorage() {
  String strState = JSON.serialize(instance).stringify();
  Window.current().getLocalStorage().setItem(STATE_KEY, strState);
}
When the State is constructed, it could perform the reverse process to load the state from storage. It could read the State from LocalStorage, and convert the string into a Java object. Then that loaded object would be saved in State for use by future calls.
public synchronized static State getState() {
  if (null == instance) {
    instance = loadFromLocalStorage();
  }
  if (null == instance) {
    instance = new State();
  }
  return instance;
}

private static State loadFromLocalStorage() {
  State state = null;

  try {
    Storage storage = Window.current().getLocalStorage();
    String strState = storage.getItem(STATE_KEY);
    if (null != strState) {
      final Node nodeState = Node.parse(strState);
      state = JSON.deserialize(nodeState, State.class);
    }
  } catch (Exception xpt) {
    Window.alert("exception loading state: " + xpt);
    xpt.printStackTrace();
  }

  return state;
}
15.8 State Downloads
If you store state in the browser's local storage, it is a good idea to allow users to extract the complete state and save it as a file. Then users can move that file to another device, should they choose, allowing their data to be moved or synced, under their full control.
To do so, we convert the state to a JSON string, then use
URL.createObjectURL to create a short URL that points to the data
string and can be used in anchors. In the following example, we'll
convert JsonPersistable state (fetched using State.getState() as
shown above). Then we'll convert it to a URL that we use on the view
template in a download link.
First, the code to create the URL (this goes in your view class):
public String getStateAsJson() {
  return JSON.serialize(State.getState()).stringify();
}

private String getDataUrl() {
  return makeObjectUrl(getStateAsJson());
}

@JSBody(params = "data", script = "return URL.createObjectURL(new Blob([data], {type: 'application/json'}));")
static private native String makeObjectUrl(String data);
In production code you'd want to cache the return value from
makeObjectUrl(), and clean it up with revokeObjectURL().
Next, in a view where we want to allow downloading, create an anchor
whose href attribute uses the generated URL:
<a download="State.json" attr:href="dataUrl">Download</a>
As described in the section on the attribute (attr) component,
attr:href lets us use a Flavour expression to set the href
attribute of the anchor. Flavour automatically detects a JavaBean
property and invokes its getter, so in this case it will call
getDataUrl() from the Java code above.
Now when the user clicks the Download link, the state will be saved
in State.json.
15.9 Viewing State
Sometimes you may wish to convert state into JSON for viewing or backup.
The following code will convert a @JsonPersistable state object to
JSON, then pretty-print it to a String suitable for human viewing:
public String convertToJson(State state) {
  return prettyPrint(JSON.serialize(state));
}

@JSBody(params = {"object"}, script = "return JSON.stringify(object, null, 2)")
native static public String prettyPrint(JSObject object);
16 Data Resources
Sometimes you want to include a data file in your app and read it at
runtime. Flavour can take a file from src/main/resources and
package it into the main app file. Then at runtime you can access the
data file as an InputStream. Let's see the details.
16.1 The Data File Itself
The actual data file should be placed in src/main/resources or a
subfolder. Lets say you were making a product name generator, so you
needed a file of words. You could place it in
src/main/resources/words.txt. To bundle it in your app you'll need
to follow a couple of additional steps.
16.2 Create a ResourceSupplier
You'll have to create a class that implements the ResourceSupplier
interface. Simply implement the interface in any class in your app,
and return the filename. For example, we'll return the words.txt
filename like this from our main Client class:
package com.example;

public class Client implements ResourceSupplier {
  public String[] supplyResources(ResourceSupplierContext context) {
    String[] result = { "words.txt" };
    return result;
  }
16.3 Register the Class
You have to register the class by creating a file
resources/META-INF/services/org.teavm.classlib.ResourceSupplier. In
that file, you have to place the fully-qualified class name of the
ResourceSupplier, in our case, com.example.Client from above.
com.example.Client
16.4 Access the Resource
OK, now you can access the resource! In your code, figure out where you want to access the data file. Often it is helpful to make a class dedicated to reading from the file, which can cache the data for future use.
To access the data file, use the class loader's getResourceAsStream
method, like you would in a Java program executing in a traditional
JVM. You'll get back an InputStream providing access to the file's
contents.
InputStream stream = MyClass.class.getClassLoader().getResourceAsStream("words.txt");
16.5 Reading Raw Text
Once you have the InputStream, you can read from the file in
different ways. In the case of our file, it will have one word per
line, so we can use BufferedReader as follows:
List<String> listLines = new ArrayList<>();
BufferedReader bufferedReader = new BufferedReader(new InputStreamReader(stream));

String strLine;
while ((strLine = bufferedReader.readLine()) != null) {
  listLines.add(strLine);
}
listLines now contains all words from the file.
16.6 Converting a JSON Resource to POJOs
Sometimes you may have structured data in a JSON file you'd like to convert to Plain Old Java Objects (POJOs). You can do that in a few steps:
- Get the
InputStream(as shown above) - Read the file into a string
- Parse the String into a
Nodeobject usingNode.parse() - Deserialize the nodes into Java POJOs using
JSON.deserialize()and the POJO root class
Say you have created a JSON file "park-data.json" and inlcuded it in
your project as shown in the previous section using
ResourceSupplier. You have also created a ParkList POJO, with
matching getters and setters to the fields in the JSON file. Then you
can create a POJO from the resource file as follows:
// Get InputStream for resource file
InputStream stream = FixedDetailedParkDataSource.class.getClassLoader().getResourceAsStream("park-data.json");

// Read into a string
char[] acBuffer = new char[1024];
StringBuilder stringBuilderOut = new StringBuilder();
Reader reader = new InputStreamReader(stream, StandardCharsets.UTF_8);
for (int ciBytesRead; (ciBytesRead = reader.read(acBuffer, 0, acBuffer.length)) > 0;) {
  stringBuilderOut.append(acBuffer, 0, ciBytesRead);
}
String strJson = stringBuilderOut.toString();

// Convert to Node
Node nodeParsed = Node.parse(strJson);
// Deserialize into POJOs
ParkList listParks = JSON.deserialize(nodeParsed, ParkList.class);
17 Styling
Web apps now have a powerful, standardized mechanism for choosing colors, fonts, borders, sizing, alignment, and more. Usually referred to by its acronym, CSS, cascading style sheets let you apply styling to parts of your app using selectors. Selectors can be broad (like p, to apply to every paragraph) or very specific (like .login-cancel-button) to apply only to elements with that class. CSS styles are often placed in text files ending with the .css extension.
17.1 CSS in Smaller Apps
In smaller apps, you can place all of your CSS in a single file. By
convention, CSS for a Flavour app goes in css/app.css. The
archetype-generated app includes this CSS file in index.html, so it is
available to every page in your app.
17.2 Large App CSS Strategies
In a larger app, The amount of CSS may grow larger and loading it all at startup may cause launch slowness. If there are some pages your users rarely see, or if there are different types of users, then it may make sense to split up your CSS and load it as needed.
In some apps, there are different groups of users. For example, your app may have customers using it to create or edit their content, and support users who need to see similar information but formatted differently or with extra administrative details. If the two groups of users don't have many screens in common, it is likely beneficial to build two separate applications, sharing data structures and service access via shared code modules. In this way the two apps will each only need the HTML, view classes, and CSS for their own screens. By contrast, if they were compiled together into one app, customers are downloading the code and CSS for the admin screens they never see, and vice versa.
17.3 CSS Tips, Tricks, and Resources for SPAs
A full guide to CSS is beyond the scope of this book. However, there are several features of modern CSS that are especially useful for single-page apps. We’ll go over those and include links to some useful CSS resources available for deeper CSS-specific questions.
17.3.1 Flex Layout
Flex Layout is a powerful, nestable layout style that is now well-supported in all browsers. It lets you create a container and provide an arbitrary number of child elements, instructing the browser the direction to lay them out, how to (optionally) wrap them, how they should grow beyond their natural size, and how to allocate additional space. It is extremely useful to make layouts that can adapt well to different screen sizes and resolutions.
17.3.2 Grid Layout
Grid Layout is an alternative layout, also supported in all major browsers. It is useful when you want to position elements in a tabular layout, with items aligned or separated by the table lines.
17.3.3 Other CSS Resources
18 Error Messages
The Flavour build system performs many checks during the build process, which can cause error messages that may need explaining the first time you see them. Below we cover some of the error messages you may encounter during a Flavour build and how to fix them.
Note: Error messages have been enhanced in Flavour in the 0.3.0 version, which can help dramatically. The examples here are from 0.3.0. If you are using an older version of Flavour (0.2.1 or lower), please consider upgrading.
18.1 Property name typo
If your View class has a getter getUserName(), it defines a JavaBean
property userName. You can use the property in an expression, like
so:
Hello, <i><html:text value="userName"/></i>
If you make a typo or forgot to add a getter, you'll get an error
message. For example, if you leave off the final e in userName, like this
<!-- Error example: typo in userName property name -->
Hello, <i><html:text value="userNam"/></i>
You'll see this error:
[ERROR] templates/client.html: Variable userNam was not found
18.2 Missing component
If you make a typo in the component name, or have a problem in a
custom component declaration or registration, you'll get an "Undefined
component" error. For example, let's omit the e from html:text:
<!-- Error example showing typo for component name html:text -->
Hello, <i><html:txt value="userName"/></i>
Flavour warns you as follows:
[ERROR] templates/client.html: Undefined component html:txt
If you get this message, check the documentation to make sure the
component is spelled correctly. If it is your own custom component,
make sure the namespace from the use line at the top of the template
matches what's before the colon, and that the component name after the
colon matches the BindELement annotation. Remember that component
names must be all lowercase.
18.3 Missing attribute component
You get a similar message for attribute components that can't be found. Let's say we are trying to use attr:class to make the class for a div dynamic. However, we accidentally leave off the r:
<div att:class="test">
There is no predefined namespace att, so this produces the following error:
[ERROR] templates/client.html: Undefined component att:class
As with element components, if you see this error check the namespace
and component name, except for attribute components the name will be
in the View class' BindAttributeComponent annotation.
18.4 Unbalanced HTML tags
If you have unbalanced HTML tags in templates, the Flavour template
parser will warn you. Below, we remove the closing </i> tag:
<!-- Error example: Italic tag is opened but not closed -->
Hello, <i><html:text value="userName"/>
The Flavour warning gives the row and column number, helping you narrow in on the offending tag quickly:
[ERROR] com.example.Client: StartTag at (r7,c10,p134) missing required end tag
18.5 Missing template
Let's switch to the Java side of things. One place you can have a
Flavour-specific problem is in the BindTemplate annotation. In this
example, we'll omit the h from client.html, asking Flavour to bind
the view class to a template that doesn't exist.
@BindTemplate("templates/client.tml")
public class Client extends ApplicationTemplate {
Flavour warns us of the missing template as follows:
[ERROR] Can't create template for com.example.Client: template templates/client.tml was not found
18.6 Missing setter with html:bidir-value
html:bidir-value lets you fully bind an input component to a JavaBean property. It uses a getter to fetch the value for initial display, and a setter to record the final value once submitted by the user. If there is a getter but no setter, you'll get this (not terribly helpful) error message:
[ERROR] Error calling proxy method org.teavm.flavour.templates.Templates.create(Lorg/teavm/metaprogramming/ReflectClass;Lo
rg/teavm/metaprogramming/Value;)V: java.lang.reflect.InvocationTargetException
The fix is straightforward, fortunately. Add a setter for the property in the View class and this error will go away.
19 Appendix A: Additional Resources
The Flavour podcast covers much of the same material as this book, only in audio form. You can subscribe on SPotify or Apple Podcasts.
The home page of the Flavour project. Includes an overview of the project, starter instructions, and links for further information.
The source code, issue tracker, and forums for Flavour live here.
20 Appendix B: Installing Prerequisites
20.1 Prerequisties
Making web apps with Flavour only requires two prerequisites:
- Java (OpenJDK 8 or equivalent. Newer versions of Java are untested.)
- Maven (Apache Maven 3.8.6 or greater)
20.2 Java
You can obtain OpenJDK builds from here: https://openjdk.org/install/
20.3 Maven
You can install Apache Maven from here: https://maven.apache.org/download.cgi
Maven installation instructions are here: https://maven.apache.org/install.html
21 Appendix C: Full-Stack Java
21.1 Full-Stack Java
Flavour lets you build modern single-page apps using Java. To get the most value from your Flavour app, it should be paired with a Java web service, as shown in this diagram:
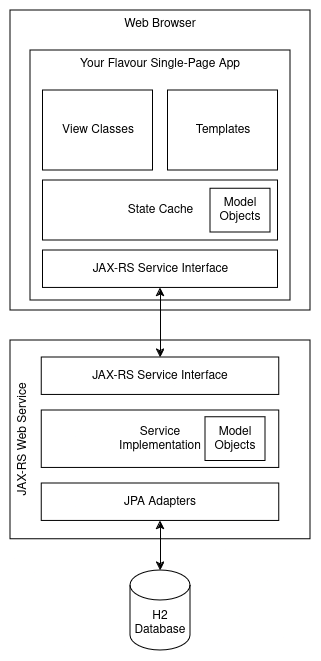
Figure 1: Full-Stack Java Architecture Diagram
22 Copyright
Copyright (C) 2025 Andrew Oliver. All Rights Reserved.